While drywall is one of the most common repairs for water damage, each job is different and can be quick and simple or a longer and more drawn-out process. We’ll dig into situations and give examples, tips, tricks, and processes to make it as quick and painless as possible.
Let’s get started.
The first thing we need to address is how to identify water-damaged drywall, its severity, and if it has a potential for or has visible mold growing on the surface. Other things need to be considered, such as is any part of the drywall is still wet, is wet behind the drywall, whether there is wet insulation behind the wall, what was the water source in the first place, and how I will correct that issue.
Here are the basic steps we will cover in this process, and we’ll keep them in the proper order to eliminate confusion.
The first step is identifying the source of the water. Until this is located and addressed properly, there’s no reason to do the repairs in the first place. It could be from many sources in a house, such as a water line in a wall rupturing or leaking. AC units in the attic, or maybe a busted hose on the washing machine, and it sprayed the wall and wet the floors.
Now that we’ve covered that information let’s look at the telltale signs of water-damaged drywall.
Visual signs of drywall water damage
- Discoloration and water stains
- Bubbling of the paint or wallpaper
- Peeling paint or wallpaper
- Walls that sag
- Mold visibly growing on interior surfaces
Why does water-damaged drywall have to be replaced?
Because it‘s been damaged by water. Drywall is made from a compound that is easily broken; it could not exist without the paper backing that sandwiches the compound. It’s crumbly, similar to a loser-packed piece of chalk. Once this compound has been saturated with water, it loses structural integrity and is more prone to problems with expansion and contraction issues over time.
We also have to consider engineering. It’s weaker at fastening locations. The spacings recommended between fasteners and placement locations are based on their weight, thickness, and beautiful math in calculating how much stress, weight, and area each fastener can reasonably hold.
You’re better off fixing it right the first time or it will come back to haunt you.
How to find water damage if there are no visible signs
Water damage is not always easy to spot, especially if hidden behind walls or under flooring. However, it's important to identify and address water damage as soon as possible, as it can lead to serious problems such as mold growth, rot, and structural damage. If you suspect your home may have water damage but you don't see any visible signs, you can use a few tools to help find it.
But before we get to the tools, let’s talk about another hint on where to look. Since mold can grow on the interior of walls, carpet, and flooring in general, if you smell a “musty” odor, see if you can isolate the room where the odors are coming from. That moldy odor is a strong sign that you have hidden water damage nearby.
Now that we’ve covered the basic information, let’s look at two tools that will help you isolate the damaged areas and the source of the present damage. One of the two tools should be used to ensure the repair area is completely dry before rebuilding.
How to find hidden water damage with a moisture meter
Moisture meter: A moisture meter is a device that uses sensors to measure the moisture content of materials. To use a moisture meter to find water damage, hold the meter against the surface you want to test. The meter will display a moisture reading, telling you if any excess moisture is present. Be sure to test multiple areas to get a comprehensive picture of the moisture levels in your home in various locations.
There will be multiple settings on most moisture meters. The moisture meter I use has 4 settings. The options are wall, masonry, softwood, and hardwood. Choose the appropriate setting and slide it against the surface.
Thermal imaging camera: A thermal imaging camera uses heat signatures to create a visual image of the inside of walls, ceilings, and other areas. To use a thermal imaging camera to find water damage, point the camera at the area you want to inspect and look for any areas that are darker or cooler than the surrounding areas. These areas may indicate the presence of moisture.
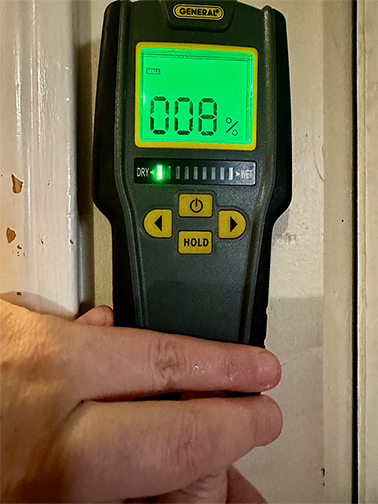
Here’s an image of a dry area according to the moisture meter. Anything below 15% is considered dry in the water damage restoration contractor's specific field. Almost everything has some moisture, so 15% is the safe mark to prevent more damage, such as inviting termites and mold into your home.
Now let’s see what the moisture meter does in an area with high moisture. We’re going to look at two different images nearby where we have visible signs of damage.
The first is next to a shower stall, just above the baseboards. Let’s take a look.
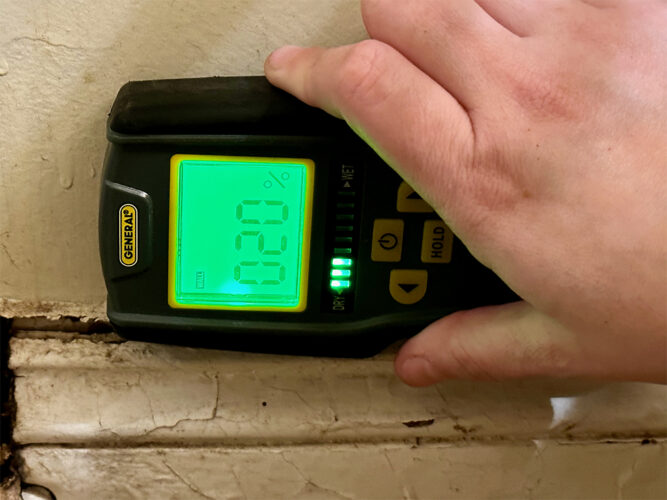
The image shows moisture above 15%, which means you have too much moisture here, making it a prime location to develop mold. This area needs to be fixed before something bad happens if it hasn’t already..
Let’s see what happens when we place the moisture meter on the tile floor just below the location this image was taken.
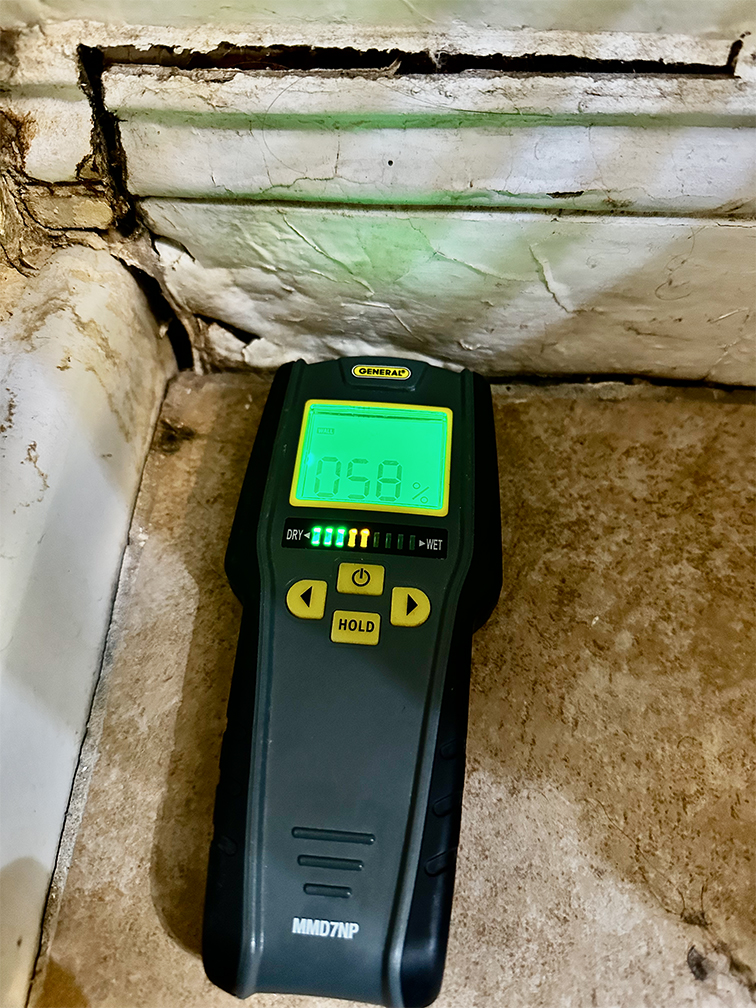
The first step is to change the meter setting to masonry. Place it on the floor and check the reading. This is not a good sign. You have excessive and dangerous amounts of moisture on the floor next to the wall that we already know is wet. Since water runs downhill, it was logical to check the floor.
The point of covering moisture meters and how to use them has multiple purposes. It’s a low-cost tool, and it will find material that is too moist, indicating water damage that already exists, even when hidden.
Thermal Imaging
Thermal imaging is a powerful tool that can be used to locate water damage and leaks in plumbing. Here's how it works:
Thermal imaging cameras use heat signatures to create a visual image of the inside of walls, ceilings, and other areas. When water is present, it absorbs and retains heat differently than dry materials, which creates a noticeable temperature difference. Using a thermal imaging camera, you can identify these temperature differences and pinpoint the location of water damage or leaks.
To use a thermal imaging camera to find water damage, point the camera at the area you want to inspect and look for any areas that are darker or cooler than the surrounding areas. These areas may indicate the presence of moisture. You can also use the camera to inspect plumbing by running it along the pipes to see if any temperature differences may indicate a leak.
One of the benefits of using thermal imaging to locate water damage and leaks is that it allows you to see behind walls, floors, and other surfaces without the need for costly and invasive demolition. This means you can quickly and efficiently identify and repair problems, saving you time and money.
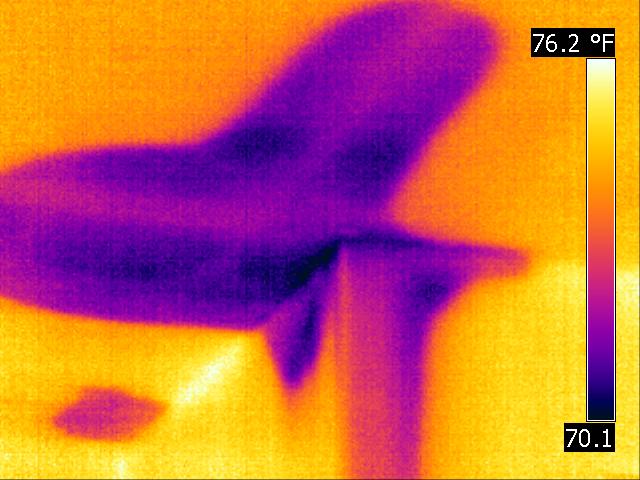
Thermal imaging is a powerful tool for homeowners and professionals alike. Whether you're looking for water damage, leaks in plumbing, or other hidden problems, it's a valuable tool in your arsenal. Here’s a thermal image of water damage to a ceiling; its source was a roof leak.
Thermal imaging is a great resource, but most thermal imaging cameras are extremely expensive, making them cost-prohibitive to the average homeowner. But there are apps for both iPhone/iPad and Android. Some are free, some require payment, but they are not that expensive. This is usually the easiest way to get a clear picture of where you have water damage in your home.
Water damaged drywall repair guide
In this guide, we'll provide step-by-step instructions on how to remove and replace damaged sections, dry out the inside of the wall, and finish the repair to make it look like new again. Whether you're a homeowner dealing with water damage or a professional looking to add this skill to your repertoire, this guide has something for you.
When it comes to repairing water damaged drywall, the first step is to remove the damaged sections. Here's how to do it:
- Cut out the damaged section of drywall: Using a utility knife or drywall saw, carefully cut around the damaged area to remove the wet drywall. Be sure to cut through the drywall's front and back layers. It’s also important to note that vertical cuts should be on the nearest stud that has not been wet. Note: If the paper backing has been wet, drywall compound will never stick to it. Cut out all drywall that has been compromised by water.
- Remove the damaged drywall: Once you've cut around the damaged area, gently remove the wet drywall from the wall. Be careful not to damage any wiring or plumbing behind the drywall.
- Measure and cut a replacement piece of drywall: Once you've removed the damaged drywall, measure the opening and cut a piece of drywall to fit. It's important to use a new piece of drywall rather than attempting to patch the damaged area, as patched drywall is more prone to future water damage. But we;re not going to install it yet. There is more to do before we start the rebuilding part of the job. We must ensure the wall's area and interior are dry and any other wet material, such as insulation, is removed and replaced.
Let’s start the drying process.
Dry out the inside of the wall
- Ventilate the area: If the weather is warm and dry, and your humidity levels are low, you can open windows and doors, and you should also use one or more fans to help circulate air. If you have a small hole to repair, less than 3×3 ft, place a fan where the airflow enters the wall with as much airflow into it as possible. If it’s a larger area you may need more than one fan. The more fans, the faster it dries.
- Use a dehumidifier: A dehumidifier can help remove excess moisture from the air, which will help dry out the wall faster. Place the dehumidifier in the room with the water-damaged wall, and run it until the wall is completely dry.
- Check for hidden moisture: Water can often get trapped in places that are not easily accessible, such as behind wallcoverings or in insulation. Use a moisture meter or thermal imaging camera to check for hidden moisture. If you find any areas of hidden moisture, take steps to dry them out as well.
Replace with new drywall
While it may be easy to explain how to remove bad drywall and cut a new replacement piece, it’s not so easy to show you how to put it back in and finish it. Unless you’ve finished drywall in the past, let it be known that there is a steep learning curve to applying the joint compound, much less making it look like a professional job.
With this in mind, we’re going to add a video that shows and explains the process. It’s far superior to see this process completed by a professional on video than reading about it and not understanding the ling, tools and supplies you’ll need to complete the job.
You will have completed your repair once you follow the directions in the video above.
In conclusion
Water damage is serious business. It holds the key to destructive health issues, damage to your home and property, and the decrease in value of your home. Ensure that you’ve followed the directions here and completed the job correctly to protect your family, home, and home's value. If you’re not sure you’re up to the task, find a water damage restoration company near you that can take care of this process immediately. It’s only going to get worse with time.
Most homeowners insurance will cover the cost of water damage in the home as long as it was not flood-related. If the water damage is flood-related, you’ll need flood insurance to make a claim.